From Tap to Top: Transforming My Urban Garden with a Hydroponic Reverse Osmosis System
I live in a big city, and in my small apartment, I have a tiny hydroponic garden. It’s my special place where I can grow plants and feel a bit closer to nature, even with all the buildings and streets around me.
But there was a problem I didn’t see at first: the water.
When I started my garden, I was really excited. I took care of the plants, making sure they got everything they needed. But they weren’t growing as well as I thought they would.
A friend who knows a lot about hydroponics came over one day and took a look. He pointed out something important – the water in the city isn’t the best for growing plants like this.
He told me about something called a hydroponic reverse osmosis system.
At first, I didn’t really understand what it was, but he said it could make a big difference. I was curious, so I decided to learn more and try it out. This wasn’t just about making my plants grow better.
It was about finding a smarter way to garden in the city.
So, I started on this path to figure out how to use this reverse osmosis system in my garden. It was a new adventure for me – finding out how to get cleaner water for my plants, and learning a lot along the way.
This is the story of how I did it, the ups and downs, and how it helped my little garden in the city.
Understanding Hydroponic Water Quality
When I first started my hydroponic garden, I thought all I needed to do was add water, and nutrients, and make sure my plants got enough light. But as I learned the hard way, not all water is the same – especially in the city.
The Role of Water in Hydroponics
In hydroponics, plants get everything they need from the water. This means the quality of water is super important.
If the water isn’t good, the plants won’t grow well, no matter what else you do.
Common Water Quality Issues
In cities, the water from our taps often has stuff in it that’s not great for hydroponic plants. It can have chemicals like chlorine, which is added to make the water safe for us to drink. However, these chemicals can harm the delicate balance needed for hydroponics.
Also, the water can be ‘hard’, meaning it has lots of minerals that might not be right for the plants.
I didn’t know all this when I started. My plants were growing, but they weren’t as healthy as they could be. That’s when I realized I needed to do something about the water. That’s where the idea of using a hydroponic reverse osmosis system came in.
It sounded like a big deal at first, but I learned it’s actually pretty simple and very helpful.
The Basics of Reverse Osmosis in Hydroponics
After realizing that the water quality was holding back my garden, I decided to dive deeper into the world of hydroponic reverse osmosis systems. At first, it sounded complex and technical, but it’s actually pretty straightforward once you get the hang of it.
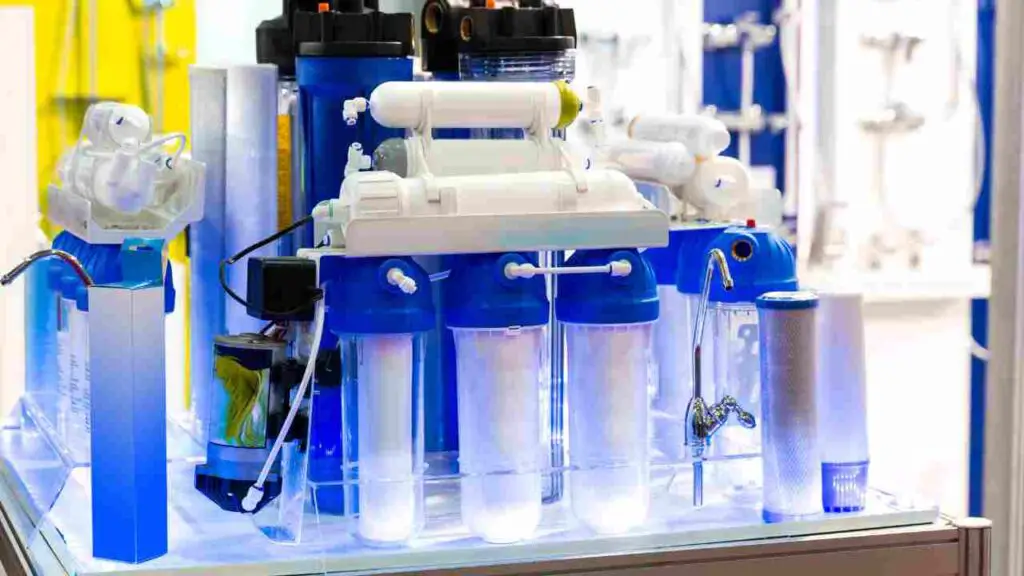
What is a Reverse Osmosis System?
Imagine a really fine filter, so fine that it can take out almost all the stuff from water that you don’t want. That’s what a reverse osmosis system does.
It pushes water through a special membrane that only lets water molecules pass through. This means it filters out things like minerals, chemicals, and other impurities that are in our city water.
Why It’s Ideal for Hydroponics
For hydroponics, this kind of pure water is like a blank canvas. It lets you control exactly what nutrients your plants get. Without all those extra minerals and chemicals in the water, you can mix your nutrient solution to be just right for your plants. This way, they get only what they need, nothing more, nothing less.
When I first heard about this, I thought it might be overkill. But then I remembered how my plants weren’t as healthy as they could be. I realized that by using reverse osmosis water, I could make sure they were getting the perfect mix of nutrients, without any harmful extras.
Setting up the system was a bit of a project, but it wasn’t as hard as I thought it would be. The real challenge was choosing the right system. There are so many options out there, and I had to find one that fit my garden’s size and budget.
Choosing the Right Hydroponic Reverse Osmosis System
After understanding the importance of pure water in hydroponics, the next step was to find the right reverse osmosis system for my garden. This wasn’t as straightforward as buying the first one I saw.
There were several factors to consider to make sure I got the most bang for my buck and the best water for my plants.
Key Features to Look For
- System Size and Water Capacity: The size of the system should match the size of your garden. A small garden won’t need a huge system, but if you have a lot of plants, you’ll need a system that can handle more water.
- Filtration Stages: Some systems have more stages of filtration than others. More stages can mean cleaner water, but it also usually means a higher price.
- Water Efficiency: This is about how much water the system uses to produce clean water. Some systems waste a lot of water, which isn’t good for the environment or your water bill.
- Ease of Installation and Maintenance: If you’re like me and not a plumbing expert, you’ll want a system that’s easy to set up and doesn’t need a lot of maintenance.
General Product Recommendations
While I can’t tell you exactly which model to buy, I can suggest looking for systems that are popular among other hydroponic gardeners. Look for brands with good reviews and a reputation for reliability. Remember, you’re investing in the health of your garden, so it’s worth getting something that will last and do a good job.
Personal Experience
I spent quite a bit of time researching and reading reviews. I wanted a system that was efficient, not too hard to install, and wouldn’t break the bank. Eventually, I found one that seemed like a good fit. It had multiple filtration stages and was designed specifically for hydroponic systems, which gave me confidence that I was making the right choice.
Installing the system was a weekend project. I followed the instructions carefully and even watched a couple of YouTube tutorials. It was a bit daunting at first, but once I got the hang of it, it wasn’t too bad.
The satisfaction of turning on the system for the first time and seeing clean water flow through was worth the effort.
Installation and Operation of Your Hydroponic Reverse Osmosis System
Once I had chosen the right reverse osmosis (RO) system for my garden, the next big step was installing and operating it. This might seem daunting, but with a bit of patience and attention to detail, it’s quite manageable. Let me walk you through the process I followed, which might help simplify things for you as well.
Setting Up Your System
- Unpacking and Preparation: Start by carefully unpacking your RO system and lay out all the parts. Check the instruction manual to ensure you have all the necessary components.
- Choosing the Location: Find a suitable spot for your system. It should be near a water source and a drain, and also close to your hydroponic setup for ease of water transport.
- Connecting to the Water Source: This usually involves attaching a feed water adapter to your cold water line. It’s important to shut off your main water supply before you start this step to avoid any mishaps.
- Installing the Filters and Membrane: Most systems come with the filters and membrane already installed, but if not, you’ll need to do this. It’s usually as simple as screwing them into place.
- Drain Line Setup: The system will have a line for wastewater, which needs to be connected to a drain. This is crucial for the filtration process.
- Pressure Gauge and Flow Restrictor: Ensure these are properly installed. They are key to maintaining the right pressure and water flow through your system.
- Final Connections and Leak Test: Once everything is connected, slowly turn your water back on and check for leaks. It’s a good idea to let the system run for a bit and monitor it before you start using the water for your plants.
Operating Tips
- First Use: The first batch of water produced should be discarded as it may contain impurities from the manufacturing process.
- Routine Checks: Regularly check the system for any leaks or signs of wear. Also, monitor the pressure gauge to ensure the system is operating at the correct pressure.
- Changing Filters: The pre-filters in your system will need to be changed periodically. This is usually a simple process, but refer to your manual for specific instructions.
- System Flushing: Some systems benefit from periodic flushing to clear out any built-up impurities. This helps maintain the efficiency of the membrane.
- Water Quality Monitoring: Even with an RO system, it’s a good idea to regularly test your water quality. This can be done with simple testing kits to ensure the system is working as it should.
Installing and running my RO system was a learning experience. At first, I was worried about doing something wrong, but as I followed each step, it became clear that it was more about being meticulous and less about being technically skilled.
Now, my plants get consistently pure water, and the difference in their growth is noticeable.
Maintenance and Troubleshooting Your Hydroponic Reverse Osmosis System
After setting up my hydroponic reverse osmosis system, I quickly learned that regular maintenance is key to keeping it running smoothly. Here are some maintenance tips and common troubleshooting solutions that have helped me along the way.
Regular Maintenance Tips
- Filter Replacement: One of the most critical maintenance tasks is replacing the filters regularly. The pre-filters, which remove sediment and chlorine, typically need to be changed every 6-12 months, depending on your water quality and usage.
- Membrane Care: The RO membrane is the heart of the system. It usually lasts longer than the pre-filters but needs to be replaced every 2-3 years. Always refer to the manufacturer’s guidelines for exact timelines.
- System Cleaning: Periodically, it’s a good idea to sanitize and clean the entire system. This can be done using a cleaning kit specifically designed for RO systems.
- Regular Inspection: Regularly inspect all components for wear and tear. Check for leaks, cracks, or any other signs of damage, especially in the tubing and connections.
Troubleshooting Common Issues
- Low Water Pressure: If the water pressure seems low, check the pressure gauge. It could be due to clogged pre-filters, a worn-out membrane, or an issue with the water supply itself.
- Water Leaks: Tighten all connections if you notice any leaks. If leaks continue, you might need to replace certain parts like O-rings or tubing.
- Poor Water Quality: If the water quality drops, it’s usually a sign that the filters or membrane needs to be replaced. Regular water testing can help you catch this issue early.
- Noisy System: Some noise is normal, but if it becomes loud or unusual, it might indicate a problem with the air gap or a clog in the drain line.
Maintaining and troubleshooting my RO system felt overwhelming at first, but with a bit of practice, it became part of my regular gardening routine. The key is to stay proactive and address issues as soon as they arise.
This not only ensures my plants get the best quality water but also extends the life of the system.
Cost Analysis and Efficiency of a Hydroponic Reverse Osmosis System
Investing in a hydroponic reverse osmosis system was a decision that went beyond just wanting better water for my plants; it was also about understanding the costs and long-term benefits.
Here’s a breakdown of what I learned about the cost-effectiveness and efficiency of using an RO system in hydroponics.
Investment vs. Benefits
- Initial Cost: The upfront cost of an RO system can vary widely. While there are cheaper options, investing in a more reliable, efficient system can save money in the long run.
- Operational Costs: These include electricity to run the system and replacement filters and membranes. It’s important to consider these ongoing costs when choosing a system.
- Water Savings: Efficient RO systems can reduce water wastage, which is not only good for the environment but can also lower water bills over time.
- Plant Health and Yield: The most significant benefit I noticed was in the health and yield of my plants. Better water quality directly translates into healthier plants and more abundant harvests, which can be a cost-benefit for those selling their produce.
Efficiency Considerations
- Water Wastage: RO systems produce wastewater. However, newer models are becoming more efficient, producing less waste. Some of this water can be reused for other purposes, like watering soil-based plants.
- Energy Use: Most RO systems are quite energy efficient. The energy cost is relatively low compared to the benefits of high-quality water.
- Environmental Impact: Using an RO system reduces the need for chemical fertilizers and pesticides, as plants are healthier from the start. This is a significant environmental benefit.
Reflecting on the costs and benefits, the initial investment in an RO system seemed high, but the improvements in my hydroponic garden made it worthwhile. Not only did my plants thrive, but I also felt good about using less water and fewer chemicals.
It was a step towards more sustainable and efficient gardening.
Personal Reflections and Results: Seeing the Difference in My Garden
After several months of using the hydroponic reverse osmosis system, I’ve noticed some significant changes in my urban garden. Reflecting on this journey, I want to share the tangible results and personal insights I’ve gained, hoping it might resonate with fellow gardeners considering a similar path.
My Experience with Improved Water Quality
- Healthier Plants: The most noticeable change was in the health of my plants. They appeared more vibrant and robust. The leaves were greener, and the overall growth rate increased.
- Increased Yield: I was thrilled to see a noticeable improvement in the yield of my plants. Whether it was leafy greens or herbs, each plant seemed to produce more than before.
- Fewer Nutrient Deficiencies: Previously, I often dealt with nutrient deficiencies, visible through yellowing leaves or stunted growth. With the RO system, these issues were drastically reduced as I could control the nutrient mix more precisely.
The Learning Curve
- Understanding Water Chemistry: I learned a lot about water quality and its impact on plant growth. It was fascinating to see how removing impurities could make such a difference.
- Adjusting Nutrient Solutions: With purer water, I had to adjust my approach to nutrient solutions. It took some trial and error to find the right balance, but the effort was worth it.
Personal Satisfaction and Environmental Consciousness
- A Sense of Achievement: Installing and maintaining the RO system gave me a sense of accomplishment. It felt great to take another step towards self-sufficiency in my urban gardening journey.
- Eco-Friendly Approach: Knowing that I was reducing my environmental footprint by conserving water and minimizing chemical use added to my satisfaction. It felt good to contribute, even in a small way, to a more sustainable future.
Final Thoughts
The decision to incorporate a hydroponic reverse osmosis system into my garden was a game-changer. Not only did it revolutionize the way I approached hydroponic gardening, but it also deepened my understanding and appreciation of the delicate balance in nature.
This journey was about more than just growing plants; it was about growing as a gardener and an environmentally conscious individual.
I hope my experience inspires others to explore the benefits of pure water in hydroponics and take their own steps toward sustainable gardening practices.