Cloning and Propagation in Hydroponics: Full Guide
If you’ve ever grown a basil plant so productive you didn’t want to lose it, you’ve already thought about cloning (you just might not have called it that). Taking a cutting from a healthy plant and rooting it hydroponically gives you an exact genetic copy of that plant, ready to produce at the same rate, with the same flavor, at the same time. No seed variation, no germination lottery, no waiting three weeks just to figure out what you’ve got.
Cloning and propagation in hydroponics is one of those techniques that sounds more technical than it is. Once you’ve done it a few times, it becomes second nature. This guide covers both the simple (a glass of water and some rockwool) and the more advanced (aeroponic cloners), plus which plants are worth the effort and how to rescue a clone that’s struggling.
What’s the Difference Between Cloning and Propagation?
Propagation is the broad term for any method of creating new plants: seeds, cuttings, division, grafting. Cloning is a specific type of vegetative propagation where you take a cutting from an existing plant and root it, producing a plant that’s genetically identical to the parent.
For hydroponic growers, this distinction matters because cloning skips the seed stage entirely. Your clone inherits whatever the mother plant had: yield capacity, flavor profile, disease resistance, growth rate. If you’ve dialed in a particular basil variety or found a tomato plant that’s outperforming everything else in your system, cloning is how you lock that in.
Which Plants Are Worth Cloning (And Which Aren’t)
Not every plant rewards you for cloning it.
Clone these:
- Basil (roots fast, produces prolifically, stays true to the parent)
- Mint (nearly impossible to kill as a clone)
- Tomatoes (especially indeterminate varieties; clone from vigorous side shoots)
- Peppers (slower to root, but a productive pepper is worth preserving)
- Coleus, impatiens, and other flowering ornamentals
- Strawberries (though runners are a more natural method; see propagating strawberry runners hydroponically)
Start these from seed instead:
- Lettuce (fast-germinating, cheap seed, no real benefit to cloning)
- Spinach and most brassicas (bolting behavior varies by plant; seed gives you a fresh start)
- Carrots, radishes, and other root vegetables (don’t clone them, ever)
- Annual herbs like cilantro (goes to seed quickly, easier to succession-plant from seed)
The rule of thumb: clone plants where the genetics actually matter or where the parent plant has proven itself in your system. Seed when it’s fast, cheap, and the individual plant’s traits don’t matter.
How to Take a Cutting for Hydroponics
The cutting itself is where most beginners go wrong, not the rooting method.
Choosing Your Mother Plant
Your mother plant should be in the vegetative stage, healthy, and not showing any stress. If it’s flowering, the cuttings will have a harder time rooting and may revert to veg inconsistently. For tomatoes and peppers, take cuttings from vigorous side shoots, not the main stem.
Tip: If you’re keeping a dedicated mother plant in veg to supply clones on demand, you’ll want to read up on light cycle settings that keep her in the vegetative stage. At 18 hours of light, most plants stay out of flower.
Taking the Cutting
Use a clean, sharp blade, not scissors, which crush the stem. Cut at a 45-degree angle just below a node (the point where a leaf meets the stem). The cutting should be 3 to 5 inches long with at least 2 to 3 leaf nodes. Remove the lower leaves so they don’t sit in your rooting medium and rot, and trim large leaves in half to reduce moisture loss while the clone has no roots to support them.
Work fast. As soon as the stem is cut, it starts sealing the wound. Get it into water or rooting hormone immediately.
Applying Rooting Hormone
Rooting hormones work by delivering synthetic auxins (the same plant hormones that trigger root development) directly to the cut end. Gel formulas are easiest to work with in hydroponics: dip the stem, hold for 5 to 10 seconds, and go straight into your rooting medium. Powder works too but can wash off in a wet environment.
For low-tech propagation in a water glass, some growers skip hormone entirely and get decent results with easy-to-root plants like basil and mint. For tomatoes or peppers, don’t skip it.
Rooting Media: What Works Best
You have a few solid options here, and the best one depends on your setup and what you’re moving the clone into.
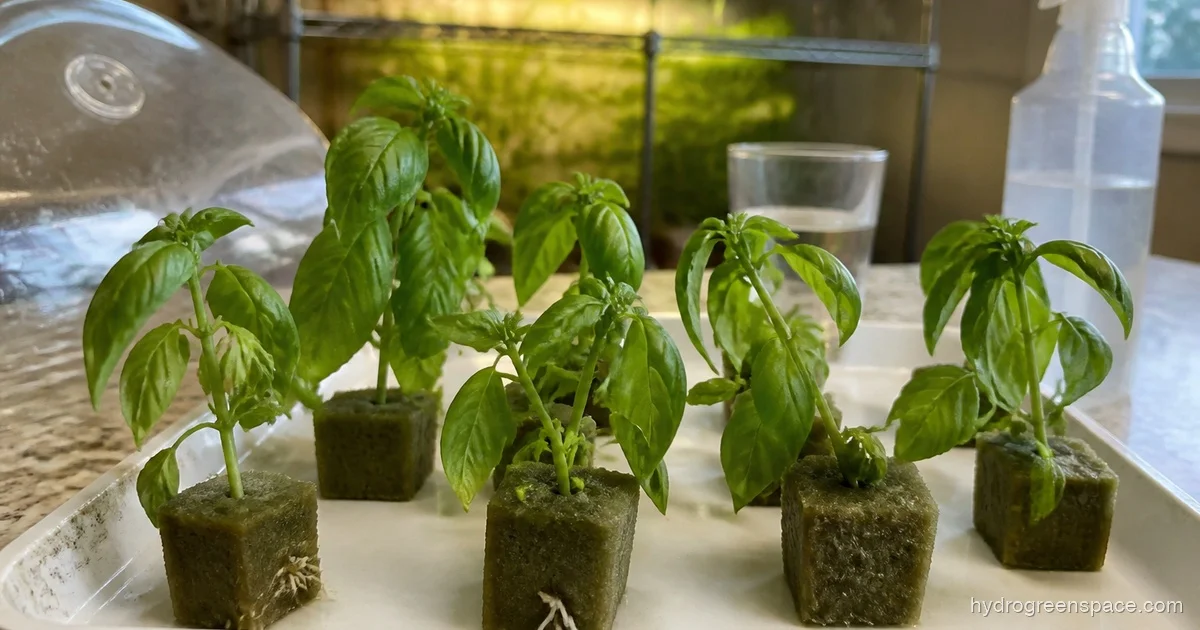
Rockwool cubes are the most widely used and for good reason. They hold moisture and air simultaneously, wick water from a reservoir without drowning the stem, and transplant easily into most hydroponic systems. Soak them in pH-balanced water (5.5 to 6.0) before use, or the alkaline rockwool pH will slow rooting. See Rapid Rooter vs rockwool for propagation if you’re deciding between the two.
Rapid Rooters (preformed plugs made from composted bark) root slightly faster for some plants and are easier on beginners because there’s no pH presoak required. They compress around the stem naturally.
Coco coir plugs are a less common but effective option, especially if your main system runs coco. Read more about coco coir as a rooting medium for the specifics.
Plain water (no medium) works for basil, mint, and some herbs. Drop cuttings into a small glass of water in indirect light, change the water every two days, and you’ll see roots in 7 to 14 days. This is the true beginner approach and it’s genuinely fine for easy-to-root plants.
Humidity Dome vs. Aeroponic Cloner
This is the main equipment decision, and the answer isn’t as dramatic as some make it out to be.
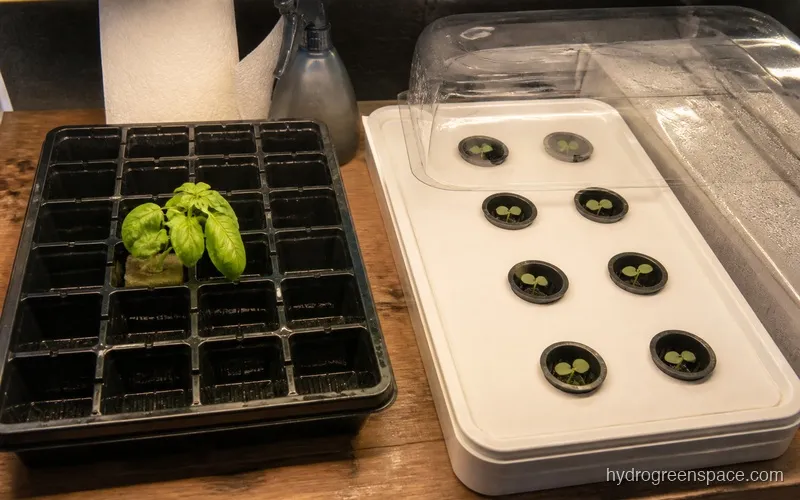
The Simple Setup: Propagation Tray + Humidity Dome
A propagation tray with a humidity dome is all most home growers need. You’re trying to keep relative humidity around 70 to 80 percent so the cutting doesn’t dry out before it can pull water through roots. Without roots, the cutting can only absorb water through its leaves.
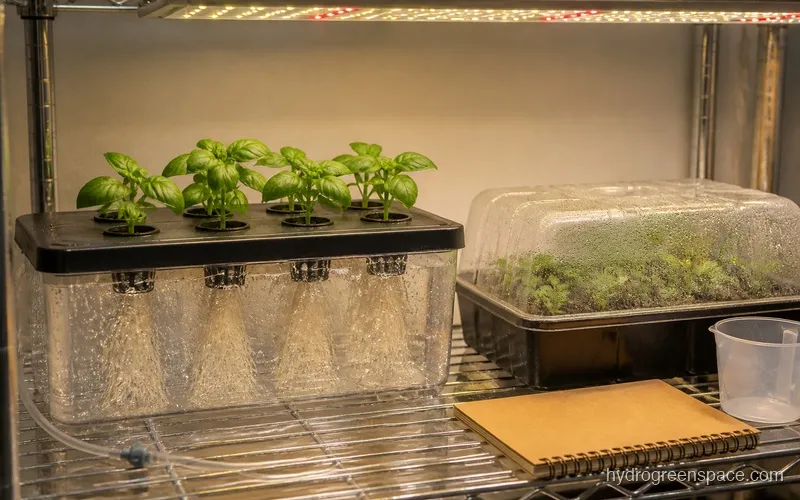
Place your rooted cuttings in the tray, mist the inside of the dome once or twice a day, and crack the dome slightly after day 5 to start hardening the clones off. Keep the tray somewhere warm (72 to 78 degrees Fahrenheit is ideal) and under indirect or low-intensity light; clones don’t need strong light before they have roots. See choosing a propagation tray for cloning for what to look for in a tray.
The Upgrade: Aeroponic Cloner
An aeroponic cloner sprays a fine mist of water directly onto the cut stems, keeping them oxygenated and moist simultaneously. The combination of high dissolved oxygen and constant moisture access accelerates root development significantly, often cutting rooting time nearly in half compared to a dome setup.
The tradeoff: cost (a basic cloner runs $60 to $150), pump maintenance, and the fact that you don’t need it unless you’re cloning frequently. If you’re doing a few clones every month or two, a tray and dome get the job done. If you’re running a perpetual system with regular cloning cycles, an aeroponic cloner pays for itself in time and root quality.
What I’d do: Start with the tray and dome. If you find yourself cloning more than a dozen plants at a time regularly, then invest in an aeroponic cloner. Don’t buy the machine before you know you’ll use it.
How Long Does It Take for Hydroponic Clones to Root?
Realistic timelines by method:
| Method | Easy plants (basil, mint) | Harder plants (tomato, pepper) |
|---|---|---|
| Water glass | 7 to 10 days | 12 to 18 days |
| Rockwool + dome | 8 to 12 days | 14 to 21 days |
| Aeroponic cloner | 5 to 7 days | 7 to 12 days |
These assume clean cuts, rooting hormone on the harder plants, proper humidity, and temperatures in the 72 to 78 degree Fahrenheit range.
How to Know When a Clone Is Ready to Transplant
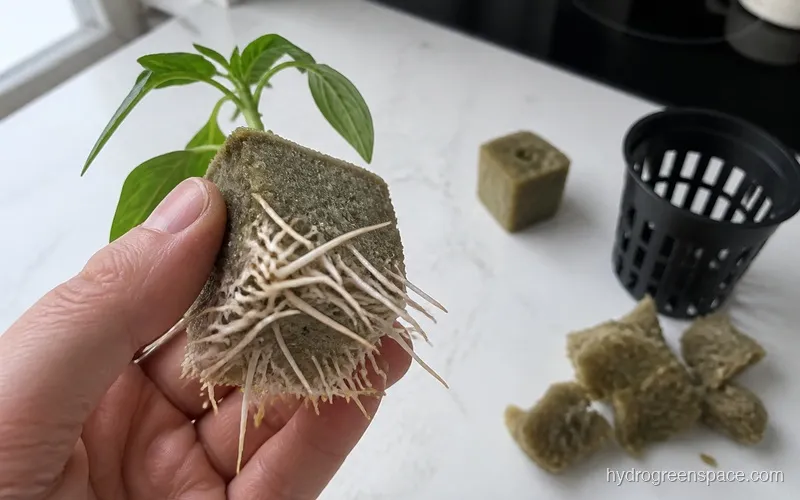
Don’t pull the cutting out to check. You’ll see roots poking through the bottom or sides of your rockwool cube or plug before you need to disturb anything. That’s your signal.
For water-rooted cuttings, wait until roots are at least 1 inch long and branching before moving into a net pot or system. Young roots are fragile and transplant shock is real. Read transplanting rooted clones into your system for step-by-step guidance on making that move without stunting growth.
Troubleshooting: When Clones Struggle
Wilting immediately after taking the cutting: This is normal for the first 24 to 48 hours. The plant is stressed from losing its root system. If wilting persists past day 3, your humidity is too low or your dome has too much airflow.
No roots after 14 days: Check three things: temperature (below 68 degrees Fahrenheit significantly slows rooting), rooting hormone (did you use it?), and the cut (was the blade clean and sharp?). Also check whether the stem is sitting in standing water at the bottom of the tray; waterlogged stems rot rather than root. Make sure your medium is moist but not saturated.
Clone leaves turning yellow: Some yellowing is expected as the clone redirects energy to root development. If it’s widespread and fast, check the water pH in your humidity tray. If you’re misting with tap water above pH 7, it can leach nutrients from the leaf tissue.
Clone dying after transplant: Usually a combination of root shock and the jump to a full nutrient solution. Start transplanted clones at 25 to 50 percent nutrient strength and ramp up over the first week. Also consider adding beneficial bacteria to protect the young roots; they colonize quickly and significantly reduce the chance of early root rot in young clones.
Warning: Don’t move clones under high-intensity grow lights right after transplanting. Give them 2 to 3 days under reduced intensity before ramping up; the root system isn’t ready to support rapid top growth yet.
Once you’ve got a reliable mother plant and a simple cloning setup, the math changes for how you run your system. Every strong performer in your garden becomes a potential source for the next round. That’s how growers stop chasing consistency and start building it in from the start. If you want to take it further, pruning and training your mother plant properly is what keeps her producing quality cuttings cycle after cycle. Cloning is one of several advanced hydroponic techniques that compound in value as your system and mother plant library mature.